 |
| The stainless steel coil and placed (This document was translated using Google Translator from the original spanish article) |
Noa, an impressive skillful woman, intending to heat the house with the fire of the plate in the kitchen, she wanted to better distribute the heat for the house of your old wood stove and saw on my blog, and in the end we put a coil efficiently adapted to your kitchen, with which it heats the radiators. Cost of the modification: 100 € and 200 € coil installed accessories for it.
We have made very good impression, we have been so pleased with their hospitality to revisit more often ;-). (Will accept requests from the entire peninsula, see the email in the top-right of the blog: D).The kitchen is typical Hergóm still present in many old houses of Spain, which gives considerable heat and uses very good wood for their manufacture refractory brick and reinforced molten metal.

In Hergóm still making this type of cuisine, with more modern lines:

She had installed, as seen in the pictures below, a copper coil to harness the power of the flames on the side of the fire up the furnace, through which the smoke and flame heating.

At first I used an open circuit with tank water heaters, and told me he had problems with tin solder, which were released if he gave a lot of candle fire. I told him that such problems could pump to circulate water without pressure, and if air accumulates at any point of coils will heat the solder too close, pulling away to reach 300 º C.

Building the stainless steel coil
After an exchange of inquiries by mail, I decided to make a coil for a good price, as built for Manel de Barna , and approaches for installation. Thanks to all drawings, dimensions and notes mailed me, just had to adapt one of the outputs of the coil on the balcony of his house ;-). So you want to work!


As the inlet opening of firewood is in the top, fire place barely have room to place coils to pick up some heat from the fire, so it had to be in the space between the top of the oven and lid , which is an area of 35x35 cm and 10 cm high, and where they spend the flames and smoke before making the trip down the side and out the back.
At first I thought about making a small stainless steel tank that soldaría rectangular fins on top to collect the heat, after unloading place by the fire for lack of space.
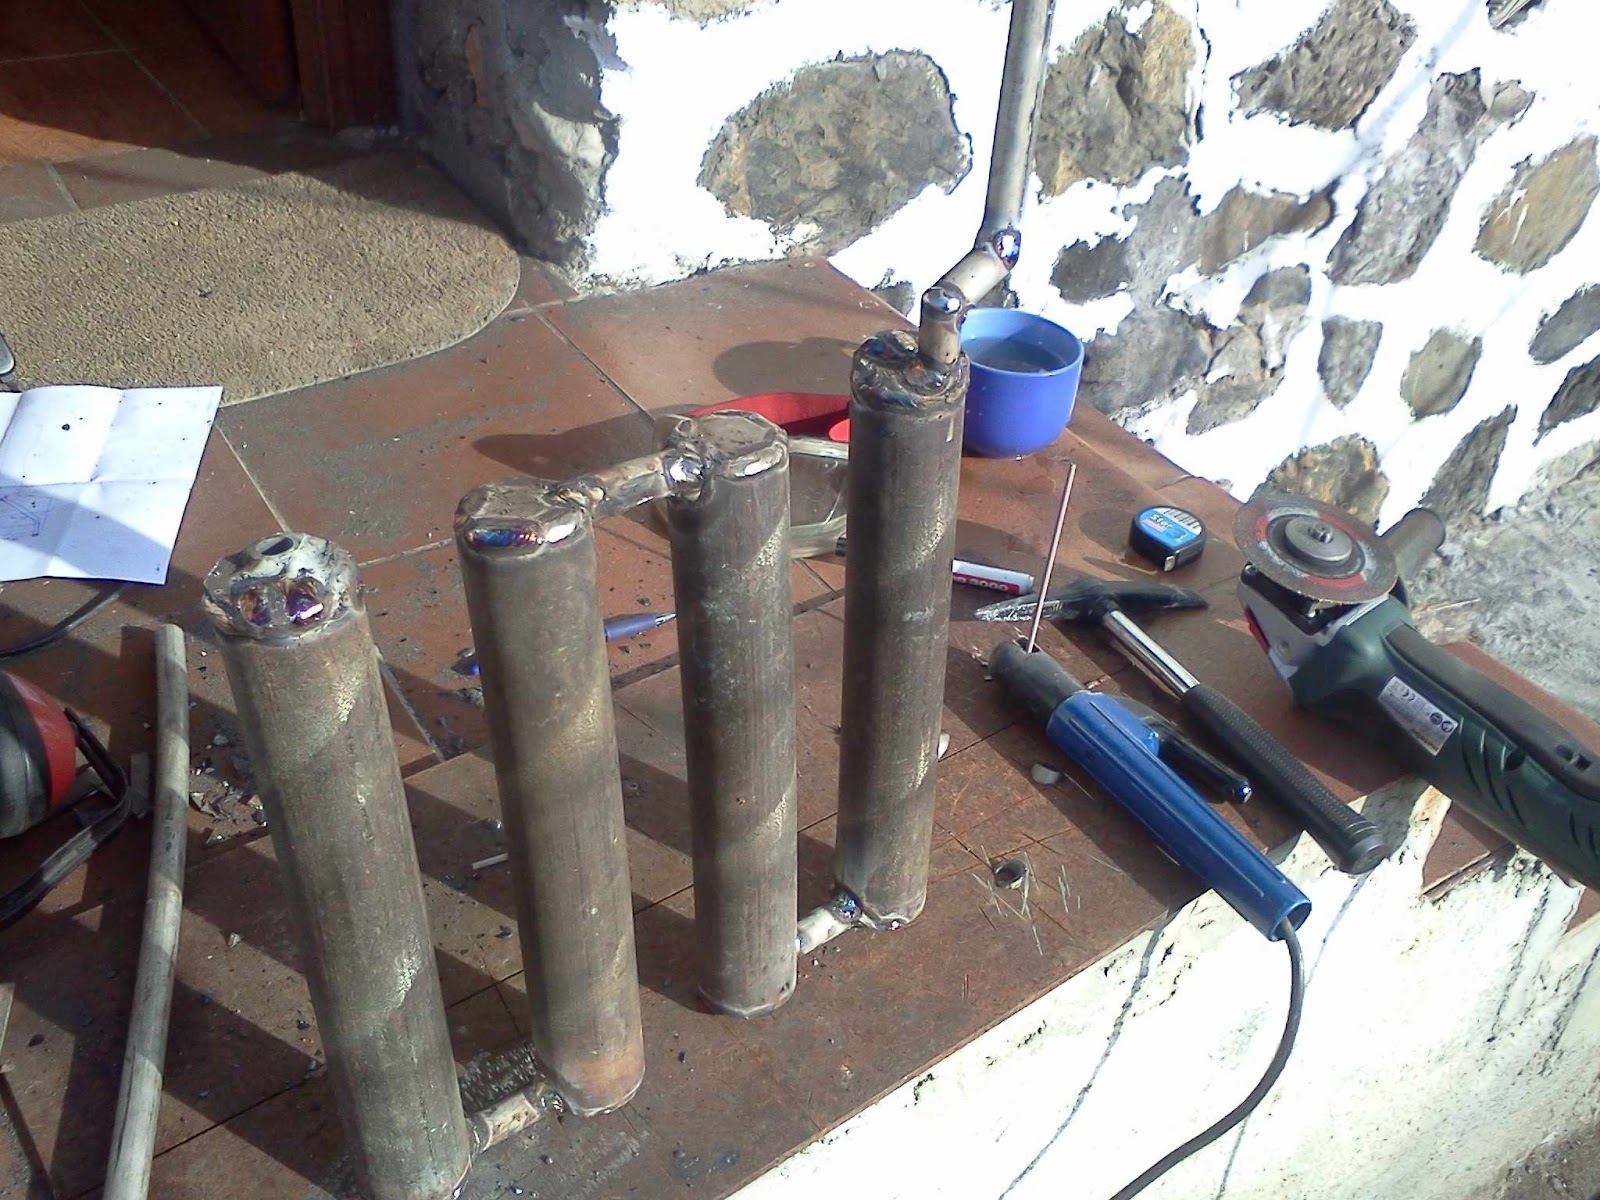
Since I had enough material to make the deposit, used a 50 mm diameter tube. and 3 mm. thick stainless steel that I cut into pieces of 35 cm. long.

I placed a presentation to see what could stop separation between each of them and at the time I entered the space provided by Noa.
To move water from one tube to another what would have been better to use pieces of the same diameter, cut to 45 degrees and soldiers on each side, but I chose to use a tube thinner to save material and the gases from combustion pass better between tubes.
To cover the side pieces of veneer used tap, then cut and finished welding. Needless to say, to be welded with care and close any pore that will be looking to have the minimum possible problems when testing.

The union between both sides of a triangle made by cutting the corner from the tube, just enough to put the small tube to the water to pass through it without removing the switch to water or welding material.

Continue tapping and welding to the next tube, connecting tubes gently to form a circuit through which water circulates.
At the end I realized that putting the connections in the center tube of 50 mm. I would air on the top of the tube, but no matter because the tube is fairly thick and then heat is transferred to the water inside, which covers more than half of the tube.

And as shown in the image below, the tubes are connected by tube Ø20 mm.


In the photo below the coil outlet complete with hot water and welded on the side. Both input and output of water the soldiers to "rough estimates" and that he had only rough measurements of the position and distance to holes in the side of the plate.
In the next image, placing a piece of sheet metal for cold water inlet.

Pending the soldier left side plates to help recover heat from exhaust gases from combustion, I stopped to perform "in situ" after Noa's house.
I tested for leakage at 7 bar, and after 4 pore plugging left, we went to his people.
Placing the coil
 |
| Emilio throwing a hand soldering |
 |
| Plates welded in place and once dotted |
Said and done, we lit the fire and we see how difficult to start, having to turn pieces of newspaper in the shot of the wall to pull the heat of the smoke from the chimney, typical of high performance stoves. In addition to the chimney draft, also has an adjustable shooting ash drawer, to be reduced when the fire already lit.

At half time the two radiators are installed (14 items total) were at 80 ° C, so it certainly can heat 4 to 6 you want to install a good temperature performance, as we said, was much better than with copper tubes, which made me very happy.
By increasing the contact surface of the gas pipe, heat is recovering well, always being careful not to cool too much smoke it can cause problems of congestion in the fireplace.
 |
| Photo of the coil below the top right of the kitchen |
Noa, with their good work and learning on the fly, put everything you need to take control of the system. In the next photo you can see the contact thermostat on the outlet pipe of hot water (set to 30 º C to jump faster and avoid formation of air), the barometer to the safety valve to the left. 3 bars, and automatic air vent is not properly placed, it takes a float inside that when filled with water, close the air path must be horizontal position to function properly, or at least some upward angle, but Noa will correct as soon as possible.

With the motor circulator and expansion tank, and have the whole circuit. Will put a UPS in case power goes out, but for now I've told you that for security do not leave the fire burning if you leave home, and if the power goes out, be careful to put out the fire with water, the unless this is not as dangerous as a nuclear power plant (read Fukushima ), but if it fails the cooling must be as cool or will drop water safety valve ;-).

In villages like Lazagurría access to cheap or free wood is easy (old vines uprooted or branches, also called branches), so it is our responsibility to re-contour the natural resources.
Thanks to the curiosity and Noa will now save a lot of energy in the winter, which always comes along with this crisis that does not seem to end, while worries about the Environment.
Note:
This document is intended to give ideas to those who have the knowledge and desire to carry them out. The author is not liable for any consequence to carry out the instructions in the tutorial. If you are burned, the boiler explodes, burns your house or anything that will happen if no precautions are taken ;-) I am not responsible.
This document is intended to give ideas to those who have the knowledge and desire to carry them out. The author is not liable for any consequence to carry out the instructions in the tutorial. If you are burned, the boiler explodes, burns your house or anything that will happen if no precautions are taken ;-) I am not responsible.
No comments :
Post a Comment