 |
| The open source electronic board Arduino Leonardo |
This plate, if you like the "Do It Yourself" is impressive:
- Cheap (from 20 €)
- Modern, comprehensive and flexible, with 20-pin I / O for highly complex projects
- Open Hardware and Software (no secrets, you can make yourself the pieces)
- Easy to program (using high-level language based on Processing )
- With many examples and an ever larger community
- Very economical and complete, Have I said it yet? XD
Let's go to the topic ... It cost me a lot to find how to install the USB driver for Windows 7 32-bit; I could'nt get it to work, did not find it, despite following the official guide .
Well, it turned out to be a "COM" virtual communications through a USB port, so first Windows needs to install the upper layer of the controller port device USB composite, with which will be in communication, and then we have the serial port driver.
If you view the device properties there will put some "Port_ 0001.Hub_ # 0007 #" like this:
TIP: Obviously to install must be left connected, so that Windows will show in the Device Manager (Control Panel -> System -> Device Manager if you have activated the view icons in the Control Panel, top right ).
And to install the driver you can simply tell Windows to look in the internet, and once installed it, we can proceed to install the communications port:
First we need to download the latest version of Interface Development or IDE Arduino page and unzip it where you want:
In the Windows Device Manager, press the right mouse button on the "Arduino Leonardo" device and give it to "Update Driver", which will ask us how we want to find the driver; clicked "Search for driver software on your computer":
Among the IDE files we downloaded earlier, there is a "drivers" folder, which is what we need to tell Windows giving "Browse":
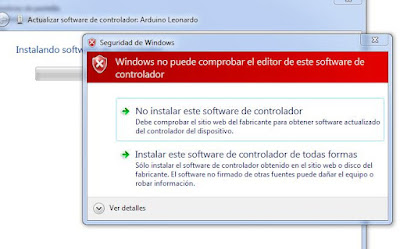
We asked for confirmation, since the driver is not signed, and give it to install anyway:
Finally ending with the controller is installed correctly (in my case appeared the next free COM, it was the 4th, but in your case may vary.
Now already we lack only tell the IDE what kind of motherboard is and what serial port is connected. For that we open Arduino.exe executable (no need to open it in administrator mode) and go to Tools -> Board and selected ours, in my case, Leonardo.
Also change the serial port, by selecting Tools -> Serial Port -> The COM port you told us earlier (COM4 in my case). Check that it gets the "tick" marked blue, otherwise, it will not catch.
To verify that we can load software onto the plate, load an example code; One of the easiest ways to start learning how it works is the Blink.
Let's File -> Examples> Basics -> Blink, and give the round arrow button right beneath the "File" menu.
After a few seconds of compilation, sends it to the plate. If you leave an odd safest error "Problem uploading code to the card" with a strange ID card, we have not selected the proper COM port. Exchange it for the correct and retest.
Operation of the rise of the code in Leonardo
According to the official guide, because the main chip used to handle communication through the serial port (being virtual, CDC controller), each time the board is reset, USB communication port is broken, and reconnect. At that moment, Leonardo disappear from the list of devices to reappear.
Thus, the strategy followed by the IDE to upload code to the card, is changed from Arduino ONE; after sending the reset command to the plate to raise the code, wait a reasonable time so that it is ready to receive the code, and then sends it to the COM port you specify and maintain Windows every time this happens.
If automatic reset does not work, we can do the process manually; hold down the reset button Leonardo, press and hold the button "get code" IDE Arduino.exe and release the reset only when the message "code up ..." in the bottom status bar of the IDE. At that time the boot plate begin creating the virtual port (CDC) again, to see the software and use it to upload the code.
Today I do not think there is a best first approach to electronics, programming, measurement, automation, intervention than Arduino. Felix E. Guerrero
In another post I will speak the language that uses Arduino, basic and instructions to get you started rules. Here is a small manual to initiate you , of the University of Alicante, or this one, a reference manual of instructions available , Brian W . Evans, translated into Castilian.
With Arduino we can create complex automata economically and electronic recycling of other devices, such as relays, motors, diodes, resistors, fans, etc., for projects such as automatic light control according to room lighting and the presence of people, or automatic control of blinds of the house, or making small "smart" for children, or robots which is what I want to use, control burning boiler stove "open source" . The only limit is your imagination.
More information:
Official Website Arduino
Arduino: The Documentary
Starting with Arduino on Windows
Manual initiation Arduino
Full manual in Spanish Brian W. Evans
Arduino Forum Official
Official Guide (English) Arduino Leonardo
Ardumanía, examples and projects to be learning and enjoying
Shop Ardumanía, Spain Arduino store with good prices, plenty of accessories and better care.
MHVLib - An Efficiency Oriented Runtime Library for AVR Microcontrollers


No comments :
Post a Comment